Have you noticed duplicate listings for your business on Facebook? You may have a page that you manage, but you’ve also noticed that there’s a “Facebook Place” with your address where people are checking in and Liking that location instead of your business page. How can you merge the two so that all the interaction is going to the same place? Here’s how.
Some things you should do first:
- Ensure that you are an Admin (or “Manager”) of your Facebook Business or Brand Page.
- Be logged in to your PERSONAL account. You should be “using Facebook” as yourself, not your business.
Also, here’s a quick explanation of Places vs Pages: a “Page” is what was formally known as a “Fan Page.” It looks like a Facebook profile page and is typically created and moderated by the business itself. A “Place” is a location people use to check in, and anyone can create one from their mobile device. This may result in multiple instances of the same location.
Now, here’s how you merge them.
Locate the Place you’d like to merge into your Page. You can do this via Facebook’s Graph Search by typing in your business name and selecting directly from the dropdown list. If you don’t see your location, click the “See more results” option at the bottom of the dropdown, then select “Places.”

From here, you’ll go through a quick walkthrough to claim the page. Here’s the first panel. Again, make sure you are an Admin of your brand page, then check the “I am an official representative” box and continue.
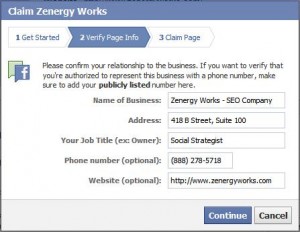
This step is important! You’re going to verify your page info. Make sure you list all of your publicly accessible, accurate information. Facebook needs to verify that you are attempting to claim a business you actually represent, so this information should closely match that of the Place you are attempting to claim.
The last frame is the verification for claiming your page. You have the option of doing this verification through email, phone number, or documentation. I’ll be using email, but you can use whatever suits you.
Your email, phone number, or documentation will need to be linked to your Facebook account AND business, so be sure to add it if it isn’t. Select the appropriate option, then click “Submit.”
Then you should get a nifty little “Claim Request” notification.
You should receive a notification email pretty quickly letting you know your claim request has been received and is being processed. Now it’s just a waiting game. Like the notification says, this request could take some time. Usually it’s done sooner rather than later, especially if you were sure to verify the business information exactly.
Once you’ve received approval for your claim, you will now be the admin of that Place page. If needed, go into your admin settings (“Edit Page” > “Edit Settings”) and update your address, business name, phone number, etc. to exactly match your primary business page. Save the changes.
From there, navigate to your primary business page and access your settings. You can do this from the options in your Admin Panel. Click “Edit Page” and select “Edit Settings.”
From your Settings list, select “Merge Pages,” which is located toward the bottom of the list of Settings.
Remember, in order to properly merge pages, you must be a manager-level administrator of BOTH pages. That means you must wait for your notification from Facebook that you’ve been approved for the page you tried to claim. After clicking on “Merge Pages,” you should have the ability to merge similar pages you’re the admin of. You can select the “Request to merge duplicate Pages” link from here.
First, we recommend you read the provided information. After that, you should see a check box indicating you have done so. Check it. A dropdown menu will come up asking you to select the page you want to keep. This is important! Select your primary brand page from the dropdown.
Next, you’ll see a second check box indicating you’ve read the information about merged pages being about the same thing. Check the box. Now you’ll see another group of drop downs. You can select up to five other pages you want to merge with your primary page, which is convenient if you’re dealing with multiple duplicates. This is where you will select the Places location you just claimed. Pages you merge will disappear as they become one with your primary page, so make sure you’re choosing correctly.
That’s it! You should be all set. The Place will be merged into your primary business page. Be aware that there are occasionally bugs in Facebook’s system that cause issues with this process, but if all is well, this should work just fine.
Stephanie Wargin is the Social Media Strategist at Zenergy Works, a web design and SEO company located in Santa Rosa, California. Her friends like to brush her hair into her eyes whenever she talks about Facebook.


